[基本架构]
squid1
squid web
squid2
squid1和squid2是姐妹关系,squid1,squid2和squid是父子关系,squid与web也是父子关系.
[IP分配信息]
squid 192.168.5.163
squid1 192.168.5.161
squid2 192.168.5.165
web 192.168.5.162
[内容]将其配置文件Copy下
squid1 192.168.5.161 配置文件
acl manager proto cache_object
acl localhost src 127.0.0.1/255.255.255.255
acl to_localhost dst 127.0.0.0/8
acl SSL_ports port 443
acl CONNECT method CONNECT
acl purge method PURGE
#acl gsrc src 192.168.5.161 192.168.5.162 192.168.5.163
#acl gdst dst 192.168.5.161 192.168.5.162 192.168.5.163
acl Safe_ports port 80
acl Safe_ports port 3130
http_access deny manager
http_access allow purge localhost
http_access deny purge
#http_access allow gsrc
#http_access allow gdst
http_access deny !Safe_ports
http_access deny CONNECT !SSL_ports
#http_access deny all
icp_access allow all
#http_port 80 accel vhost vport
hierarchy_stoplist cgi-bin ?
acl QUERY urlpath_regex cgi-bin \?
cache deny QUERY
visible_hostname slibing1.squid.com
cache_mgr zhengjun.zhu@tiancity.com
#refresh_pattern ^ftp: 1440 20% 10080
#refresh_pattern ^gopher: 1440 0% 1440
refresh_pattern -i .html$ 10 50% 20
acl apache rep_header Server ^Apache
broken_vary_encoding allow apache
coredump_dir /usr/local/squid/var/cache
cache_mem 64 MB
###################################################
http_port 80 accel vhost vport
icp_port 3130
cache_peer 192.168.5.163 parent 80 0 no-query originserver no-digest name=cache0
cache_peer 192.168.5.161 sibling 80 3130 name=cache1
cache_peer 192.168.5.163 sibling 80 3130 name=cache2
cache_peer 192.168.5.165 sibling 80 3130 name=cache3
cache_peer_domain cache0 www.squid.com
http_access deny !Safe_ports
digest_generation on
log_icp_queries on
icp_hit_stale on
acl all src 0.0.0.0/0.0.0.0
acl manager proto cache_object
acl localhost src 127.0.0.1/255.255.255.255
acl to_localhost dst 127.0.0.0/8
acl SSL_ports port 443
acl CONNECT method CONNECT
acl purge method PURGE
#acl gsrc src 192.168.5.161 192.168.5.162 192.168.5.163
#acl gdst dst 192.168.5.161 192.168.5.162 192.168.5.163
http_access deny manager
http_access allow purge localhost
http_access deny purge
#http_access allow gsrc
#http_access allow gdst
#http_access deny !Safe_ports
http_access deny CONNECT !SSL_ports
#http_access deny all
icp_access allow all
#http_port 80 accel vhost vport
hierarchy_stoplist cgi-bin ?
acl QUERY urlpath_regex cgi-bin \?
cache deny QUERY
visible_hostname slibing2.squid.com
cache_mgr zhengjun.zhu@tiancity.com
#refresh_pattern ^ftp: 1440 20% 10080
#refresh_pattern ^gopher: 1440 0% 1440
refresh_pattern -i .html$ 10 50% 20
acl apache rep_header Server ^Apache
broken_vary_encoding allow apache
coredump_dir /usr/local/squid/var/cache
cache_mem 64 MB
###################################################
http_port 80 accel vhost vport
icp_port 3130
cache_peer 192.168.5.163 parent 80 0 no-query originserver no-digest name=cache0
cache_peer 192.168.5.161 sibling 80 3130 name=cache1
cache_peer 192.168.5.163 sibling 80 3130 name=cache2
cache_peer 192.168.5.165 sibling 80 3130 name=cache3
cache_peer_domain cache0 www.squid.com
acl Safe_ports port 80
acl Safe_ports port 3130
http_access deny !Safe_ports
negative_ttl 1 second
icp_query_timeout 2000
digest_generation on
log_icp_queries on
icp_hit_stale on
acl all src 0.0.0.0/0.0.0.0
acl manager proto cache_object
acl localhost src 127.0.0.1/255.255.255.255
acl to_localhost dst 127.0.0.0/8
acl SSL_ports port 443
acl CONNECT method CONNECT
acl purge method PURGE
acl CactiServer src 127.0.0.1 192.168.5.163
acl CactiServer src 192.168.5.161/255.255.255.255
acl SNMP snmp_community passwd
#acl gsrc src 192.168.5.161 192.168.5.162 192.168.5.163
#acl gdst dst 192.168.5.161 192.168.5.162 192.168.5.163
http_access allow manager localhost
http_access deny manager
http_access allow purge localhost
http_access deny purge
#http_access allow gsrc
#http_access allow gdst
#http_access deny !Safe_ports
http_access deny CONNECT !SSL_ports
#http_access deny all
snmp_access allow SNMP CactiServer
snmp_access deny all
hierarchy_stoplist cgi-bin ?
acl QUERY urlpath_regex cgi-bin \?
cache deny QUERY
visible_hostname parent.squid.com
cache_mgr zhengjun.zhu@tiancity.com
#refresh_pattern ^ftp: 1440 20% 10080
#refresh_pattern ^gopher: 1440 0% 1440
refresh_pattern -i .html$ 10 50% 20
acl apache rep_header Server ^Apache
broken_vary_encoding allow apache
coredump_dir /usr/local/squid/var/cache
cache_mem 64 MB
###################################################
http_port 80 accel vhost vport
icp_port 3130
cache_peer 192.168.5.162 parent 80 0 no-query originserver no-digest name=cache0
cache_peer 192.168.5.163 sibling 80 3130 name=cache2
cache_peer 192.168.5.165 sibling 80 3130 name=cache3
cache_peer_domain cache0 [url]www.squid.com[/url]
acl Safe_ports port 80
acl Safe_ports port 3130
http_access deny !Safe_ports
negative_ttl 1 second
icp_query_timeout 2000
icp_access allow all
digest_generation on
log_icp_queries on
icp_hit_stale on
在其加了一个mod_expires模块
ExpiresActive On
ExpiresDefault A600
————————————————————————————————————————————
————————————————————————————————————————————
配置文件:
/etc/squid/squid.conf
/usr/sbin/squid
chmod -R 755 /usr/local/squid/var/cache
cache_mem
maximum_object_size_in_memory
memory_replacement_policy
cache_replacement_policy
cache_dir
store_dir_select_algorithm
max_open_disk_fds
minimum_object_size
maximum_object_size
cache_swap_low
cache_swap_high
————————————————————————————————————————————————
/usr/sbin/squid -z
/usr/sbin/squid -k shutdown
/usr/sbin/squid -k reconfig
59 * * * * /usr/sbin/squid -k rotate
#查看squid运行状况
/usr/sbin/squidclient -p 80 mgr:info
/usr/sbin/squidclient -p 80 mgr:5min
/usr/sbin/squidclient -p 80 mgr:mem
/usr/sbin/squidclient -p 80 mgr:diskd
/usr/sbin/squidclient -p 80 mgrbjects
/usr/sbin/squidclient -p 80 -m PURGE http://img.test.com/h/a.jpg
#cat /var/log/squid/access.log | grep TCP_MEM_HIT
#cat /usr/local/squid/var/logs/access.log | grep TCP_HIT
#cat /usr/local/squid/var/logs/access.log | grep TCP_MISS
—————————————————反向代理配置—————————————————————————
cache_peer www.servera2.net parent 80 80 no-query originserver weight=1 name=b
#cache_peer ch.gon0ng.com parent 80 80 no-query originserver weight=1 name=c
#cache_peer *.cn.gon0ng.com parent 80 80 no-query originserver weight=1 name=d
cache_peer_domain b www.servera2.net
#cache_peer_domain c ch.gong0ng.com
#cache_peer_domain d *.cn.gon0ang.com
#若cache_peer中指定了一台服务器,而cache_peer_domain中没有做指定,则不同域名的域名都将转发到这台无cache_peer_domain的服务器上。
cache_peer 222.73.69.0 parent 80 0 no-query originserver name=y
cache_peer_access y allow myweb
http_access allow myweb
#acl DIRECT url_regex -i ^http:\/\/www\.servera1\.net\/$
#cache deny DIRECT
一、squid反向代理介绍
什么是反向代理呢?其实,反向代理也就是通常所说的WEB服务器加速,它是一种通过在繁忙的web服务器和Internet之间增加一个高速的WEB缓冲服务器(即:web反向代理服务器)来降低实际的web服务器的负载。
Web服务器加速(反向代理)是针对Web服务器提供加速功能的。它作为代理Cache,但并不针对浏览器用户,而针对一台或多台特定Web服务器(这也是反向代理名称的由来)。实施反向代理,只要将Reverse Proxy Cache设备放置在一台或多台Web服务器前端即可。当互联网用户访问某个WEB服务器时,通过DNS服务器解析后的IP地址是Reverse Proxy Server的IP地址,而非原始Web服务器的IP地址,这时Reverse Proxy Server设备充当Web服务器,浏览器可以与它连接,无需再直接与Web服务器相连。因此,大量Web服务工作量被卸载到反向代理服务上。不但能够防止外部网主机直接和web服务器直接通信带来的安全隐患,而且能够很大程度上减轻web服务器的负担,提高访问速度。
只上图只是一个简单架构图,代理服务器不光要实现反向代理,普通代理,以及负载均衡等技术的应用。
二、squid反向代理配置
1.Squid2.5反向代理单个后台WEB服务器
如果web服务器和反向代理服务器是两台单独的机器(一般的反向代理应该有两块网卡分别连接了内外部网络)。那么,应该修改下面的内容来设置反向代理服务。
vi /etc/squid/squid.conf
http_port 80 #squid监听的端口
cache_mem 64 MB
cache_dir ufs /var/spool/squid 4096 16 256
cache_effective_user squid
cache_effective_group squid
dns_nameservers 202.103.24.68
cache_access_log /var/log/squid/access.log
cache_log /var/log/squid/cache.log
cache_store_log /var/log/squid/store.log
visible_hostname 192.168.1.1
cache_mgr abc@126.com
httpd_accel_host 192.168.1.2 #内部WEB服务器的IP地址
httpd_accel_port 80 #WEB服务器的IP地址
httpd_accel_single_host on #转发为缓冲的请求到一台单独的机器
httpd_accel_with_proxy on
httpd_accel_uses_host_header off
如果WEB服务器和反向代理服务器是同一台机器。那么,应该设置WEB服务器的监听端口为非80端口(比如:81端口)。要修改的内容如下:
httpd_accel_host localhost #内部web服务器的IP地址
httpd_accel_port 81 #web服务器的IP地址
httpd_accel_single_host on #转发为缓冲的请求到一台单独的机器
httpd_accel_with_proxy on #
httpd_accel_uses_host_header off
2.Squid2.5反向代理多个后台WEB服务器
httpd_accel_host virtual
httpd_accel_port 80
httpd_accel_single_host off
httpd_accel_uses_host_header on
说明:在实现反向代理的应用上,主要是把应用的方案搞清楚,是实现负载均衡还是为多个网站实现代理。
三、squid反向代理配置
1.Squid2.6反向代理多个后台WEB服务器
vi /etc/squid/squid.conf
http_port 80 vhost /*监听本机所有接口*/
cache_mem 64 MB
cache_dir ufs /var/spool/squid 4096 16 256
cache_effective_user squid
cache_effective_group squid
dns_nameservers 202.103.24.68
cache_access_log /var/log/squid/access.log
cache_log /var/log/squid/cache.log
cache_store_log /var/log/squid/store.log
visible_hostname 192.168.1.1
cache_mgr abc@126.com
#节点设为no-query以及originserver 参数指明是源服务器,
#round-robin 参数指明squid通过轮询方式
#192.168.1.1是内部web服务器
cache_peer 192.168.1.2 parent 80 0 no-query originserver name=a
cache_peer 192.168.1.3 parent 80 0 no-query originserver name=b
#实现代理多台WEB服务器
cache_peer_domain a www.koumm.com
cache_peer_domain b abc.koumm.com
acl all src 0.0.0.0/0.0.0.0
http_access allow all
cache_peer_access a allow all
cache_peer_access b allow all
说明:
(1)以上配置squid的版本为2.6,且只是在基本代理的基础上进行反的向代理的配置,反向代理相当于发布内网的服务器,又起到加速作用。
(2)在实验的过程中,以上配置文件只是起到最基本的作用,能够完成实验,如果要在实际环境中应用,还需要考虑安全与性能方面的内容,比如防火墙。
(3)配置环境的要求:
XP客户端:
hosts文件如下
192.168.129.21 www.koumm.com
192.168.129.21 abc.koumm.com
squid服务端:
外网IP:192.168.129.21
内网IP:192.168.1.1
/etc/hosts文件,注意这是内网的web服务器的域名,可以用dns实现。
192.168.1.2 www.koumm.com
192.168.1.3 abc.koumm.com
四、squid反向代理负载均衡配置
Squid2.6反向代理多个后台WEB服务器,后面的两台内容一样。
vi /etc/squid/squid.conf
http_port 80 vhost /*监听本机所有接口*/
cache_mem 64 MB
cache_dir ufs /var/spool/squid 4096 16 256
cache_effective_user squid
cache_effective_group squid
dns_nameservers 202.103.24.68
cache_access_log /var/log/squid/access.log
cache_log /var/log/squid/cache.log
cache_store_log /var/log/squid/store.log
visible_hostname 192.168.1.1
cache_mgr abc@126.com
#节点设为no-query以及originserver 参数指明是源服务器,
#round-robin 参数指明squid通过轮询方式
#192.168.1.2/3是内部web服务器,两台内容可以一样,实现均衡负载。
cache_peer 192.168.1.2 parent 80 0 no-query originserver round-robin name=a
cache_peer 192.168.1.3 parent 80 0 no-query originserver round-robin name=b
#实现均衡负载。
cache_peer_domain a www.koumm.com
cache_peer_domain b www.koumm.com
acl all src 0.0.0.0/0.0.0.0
http_access allow all
cache_peer_access a allow all
cache_peer_access b allow all
------------------------------------------------------------------------------
ydabing,好消息,Squid-2.6之集群(sibling模式)Web反向代理加速实验成功啦
昨天晚上到了两点多才睡觉,把squid官方的电邮记档翻了个底朝天(当然只找我想要的),今天总算把sibling模式的集群给做出来。
access.log之中出现了激动人心日志:
CODE:
1167289010.723 24 192.168.1.4 TCP_MISS/200 824 GET http://img.test.org:1080/test/test.html - SIBLING_HIT/192.168.1.203 text/html
CODE:
1167288960.602 126 192.168.1.4 TCP_MISS/200 687 GET http://img.test.org:1080/test/test.html - FIRST_UP_PARENT/192.168.1.201 text/html
1167289010.127 0 192.168.1.203 UDP_HIT/000 66 ICP_QUERY http://img.test.org:1080/test/test.html - NONE/- -
1167289010.720 0 192.168.1.203 TCP_MEM_HIT/200 694 GET http://img.test.org:1080/test/test.html - NONE/- text/html
真是高兴急啦,先上来自己贺喜一下子,稍候整理文档和配置发上来。
http://bbs.chinaunix.net/viewthread.php?tid=798564或者http://blog.haohtml.com/index.php/archives/1048
我在FreeBSD操作系统之下,首先portsnap fetch extract update更新ports,然后
cd /usr/ports/www/squid26/
make rmconfig;make PREFIX=/usr/local/squid1
这就是安装cache1了。
然后安装cache2到/usr/local/squid2
我看了,其配置参数如下:
execdir=/usr/local/squid1/libexec/squid --localstatedir=/usr/local/squid1/squid --sysconfdir=/usr/local/squid1/etc/squid --e
nable-removal-policies=lru heap --disable-linux-netfilter --disable-linux-tproxy --disable-epoll --enable-auth=basic ntlm di
gest --enable-basic-auth-helpers=NCSA PAM MSNT SMB YP --enable-digest-auth-helpers=password --enable-external-acl-helpers=ip
_user session unix_group wbinfo_group --enable-ntlm-auth-helpers=SMB --enable-storeio=ufs diskd null --enable-htcp --enable-
cache-digests --enable-wccpv2 --disable-http-violations --enable-referer-log --enable-useragent-log --enable-follow-x-forwar
ded-for --enable-kqueue --with-large-files --enable-large-cache-files --enable-err-languages=Azerbaijani Bulgarian Catalan C
zech Danish Dutch English Estonian Finnish French German Greek Hebrew Hungarian Italian Japanese Korean Lithuanian Polish
Portuguese Romanian Russian-1251 Russian-koi8-r Serbian Simplify_Chinese Slovak Spanish Swedish Traditional_Chinese Turki
sh --enable-default-err-language=English --prefix=/usr/local/squid1 i386-portbld-freebsd6.2
其他系统参照这个配置即可。
我用FreeBSD的ports安装很简单,他会给我一个菜单,菜单的配置如下:
===> The following configuration options are available for squid-2.6.6:
SQUID_LDAP_AUTH=off "Install LDAP authentication helpers"
SQUID_SASL_AUTH=off "Install SASL authentication helpers"
SQUID_DELAY_POOLS=off "Enable delay pools"
SQUID_SNMP=off "Enable SNMP support"
SQUID_CARP=on "Enable CARP support"
SQUID_SSL=off "Enable SSL support for reverse proxies"
SQUID_PINGER=off "Install the icmp helper"
SQUID_DNS_HELPER=off "Use the old 'dnsserver' helper"
SQUID_HTCP=on "Enable HTCP support"
SQUID_VIA_DB=off "Enable forward/via database"
SQUID_CACHE_DIGESTS=on "Enable cache digests"
SQUID_WCCP=on "Enable Web Cache Coordination Prot. v1"
SQUID_WCCPV2=on "Enable Web Cache Coordination Prot. v2"
SQUID_STRICT_HTTP=on "Be strictly HTTP compliant"
SQUID_IDENT=on "Enable ident (RFC 931) lookups"
SQUID_REFERER_LOG=on "Enable Referer-header logging"
SQUID_USERAGENT_LOG=on "Enable User-Agent-header logging"
SQUID_ARP_ACL=off "Enable ACLs based on ethernet address"
SQUID_PF=off "Enable transparent proxying with PF"
SQUID_IPFILTER=off "Enable transp. proxying with IPFilter"
SQUID_FOLLOW_XFF=on "Follow X-Forwarded-For headers"
SQUID_ICAP=off "Enable ICAP client functionality"
SQUID_AUFS=off "Enable the aufs storage scheme"
SQUID_COSS=off "Enable the COSS storage scheme"
SQUID_KQUEUE=on "Use kqueue(2) instead of poll(2)"
SQUID_LARGEFILE=on "Support log and cache files >2GB"
SQUID_STACKTRACES=off "Create backtraces on fatal errors"
===> Use 'make config' to modify these settings
说明:
我在同一台服务器测试的,但是我用的不同的IP和不同的端口,多台服务器类似,不多说了。
cache1安装在/usr/local/squid1
cache2安装在/usr/localsquid2
按照我这样子的安装:
cache1的配置在/usr/local/squid1/etc/squid/squid.conf
cache2的配置在/usr/local/squid2/etc/squid/squid.conf
然后我的IP相关信息分配如下:
原始WEB服务器,192.168.1.201,端口80
CACHE1,192.168.1.202,端口1080,ICP端口3132
CACHE2,192.168.1.203,端口1080,ICP端口3133
然后其他的配置按照我上传的文件即可:
cache1的配置
分别在两个cache服务器上执行:
#cache1
rm -rf /usr/local/squid1/squid/cache/* ; /usr/local/squid1/sbin/squid -z ; /usr/local/squid1/sbin/squid -NCd1
#cache2
rm -rf /usr/local/squid2/squid/cache/* ; /usr/local/squid2/sbin/squid -z ; /usr/local/squid2/sbin/squid -NCd1
这个时候,你就可以开始访问测试了。
当然,我的测试域名,我用我本地的DNS做了指向,测试过程之中,分别指向过202和203来检查是否有实际的效果。
/usr/local/squid目录/squid/logs/access.log
在我们配置存在问题的时候,调试窗口会出现:
temporary disabling (Forbidden) digest from 192.168.1.203
或者
temporary disabling (Forbidden) digest from 192.168.1.202
而且access.log会出现:
UDP_MISS和TCP_DENIED/403
UDP_MISS在初次一般会出现的,因为他没有缓存,还没有cache_degist。
而Forbidden和TCP_DENIED说明我们没有设置好acl.
所以我的配置之中,加了:
acl gsrc src 192.168.1.201 192.168.1.202 192.168.2.203
acl gdst dst 192.168.1.201 192.168.1.202 192.168.2.203
http_access allow gsrc
http_access allow gdst
则,我们的原始WEB服务器和CACHE服务器群之间,相互放行。
这样子的问题就不会出现了。
如果按照我前面的配置,应该是不会出现这样子的情况的,测试一下子,tail -f access.log就可以知道了。
然后,把gsrc和gdst的部分注释掉,再来测试,上面的情况,几乎是一定出现的。
大家如果有条件,请尽快测试,如果发现什么问题,望告诉我,再来完善调整哦。
另外,这里仅仅是为了测试和实现sibling模式的群,所以,配置里面的其他部分,就没有仔细设置了,请大家见谅。
本文只是为了详细了解squid的集群负载均衡的配置而模拟出来的一个实验环境。目的是想深入了解squid反向代理以及squid集群负载均衡的配置。也是对近期squid学习成果的检验,准备的环境比较简单,可能没有实用价值,只是了解其配置思路。
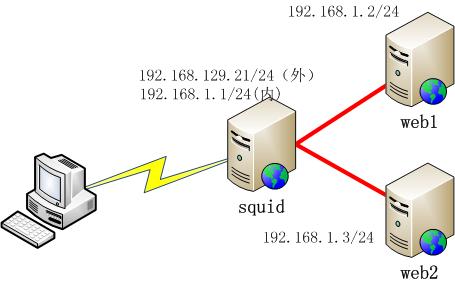
背景描述:
一家公司要提供互联网服务,为了保证访问性能,采用squid反向代理来实现,来提高性能。想像架构图如下:
(1)公司域名www.abc.com,通过dns轮循的方式,指向A,B两台squid反向代理服务器。
(2)A,B squid反向代理服务器的环境如下,他们分别代理内网的两台web服务器,web1,web2,两台web服务器内容同步,实现高可能性与负载均衡,web服务器的架构在些不做绍。
A:squid反向代理服务器
IP:192.168.129.21/24(外网ip)
192.168.1.1(内网ip)
B:squid反向代理服务器
IP:192.168.129.22/24(外网ip)
192.168.1.2(内网ip)
web1:
IP:192.168.1.20
web2:
IP:192.168.1.30
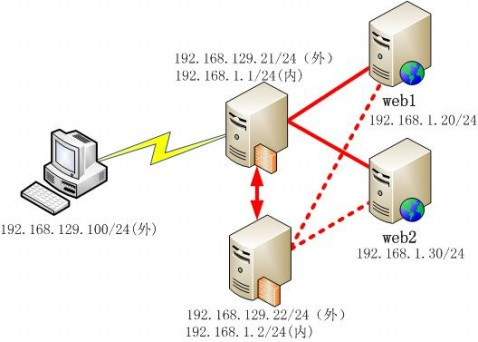
squid反向代理负载均衡配置
分别在A,B上安装Squid,配置好相关环境。
1.A服务器squid配置如下:
vi /etc/squid/squid.conf
http_port 192.168.129.21:80 vhost /*监听本机所有接口*/
cache_mem 64 MB
cache_dir ufs /var/spool/squid 4096 16 256
cache_effective_user squid
cache_effective_group squid
dns_nameservers 202.103.24.68
cache_access_log /var/log/squid/access.log
cache_log /var/log/squid/cache.log
cache_store_log /var/log/squid/store.log
visible_hostname 192.168.1.1
cache_mgr abc@126.com
#将icp通讯端口设置为3130,squid之间缓存同步查询数据时用的。
icp_port 3130
#A反向代理的内部服务器
cache_peer 192.168.1.20 parent 80 0 no-query originserver no-digest name=a
cache_peer 192.168.1.30 parent 80 0 no-query originserver no-digest name=b
#连接本地的与另一台Squid工作在sibling模式,实现数据的调取
cache_peer 192.168.129.21 sibling 80 3130 name=cache1
cache_peer 192.168.129.22 sibling 80 3130 name=cache2
acl Safe_ports port 80
acl Safe_ports port 3130
#允许以上端口的代理
cache_peer_domain a www.abc.com
cache_peer_domain b www.abc.com
acl all src 0.0.0.0/0.0.0.0
http_access allow all
cache_peer_access a allow all
cache_peer_access b allow all
2.B服务器squid配置如下:
vi /etc/squid/squid.conf
http_port 192.168.129.22:80 vhost /*监听本机所有接口*/
cache_mem 64 MB
cache_dir ufs /var/spool/squid 4096 16 256
cache_effective_user squid
cache_effective_group squid
dns_nameservers 202.103.24.68
cache_access_log /var/log/squid/access.log
cache_log /var/log/squid/cache.log
cache_store_log /var/log/squid/store.log
visible_hostname 192.168.1.2
cache_mgr abc@126.com
icp_port 3130
cache_peer 192.168.1.20 parent 80 0 no-query originserver no-digest name=a
cache_peer 192.168.1.30 parent 80 0 no-query originserver no-digest name=b
cache_peer 192.168.129.21 sibling 80 3130 name=cache1
cache_peer 192.168.129.22 sibling 80 3130 name=cache2
acl Safe_ports port 80
acl Safe_ports port 3130
cache_peer_domain a www.abc.com
cache_peer_domain b www.abc.com
acl all src 0.0.0.0/0.0.0.0
http_access allow all
cache_peer_access a allow all
cache_peer_access b allow all
案例配置分析:
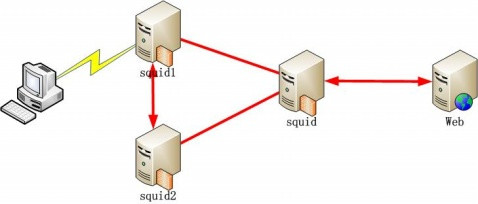
squid1和squid2是姐妹关系,squid1,squid2和squid是父子关系,squid与web也是父子关系.
[IP分配信息]
squid 192.168.5.163
squid1 192.168.5.161
squid2 192.168.5.165
web 192.168.5.162
根据上面的案例,在实际应用中可以实际各种不同应用。
======
squid1
======
http_port 80 accel vhost vport
icp_port 3130
cache_peer 192.168.5.161 parent 80 0 no-query originserver no-digest name=cache0
cache_peer 192.168.5.161 sibling 80 3130 name=cache1
cache_peer 192.168.5.163 sibling 80 3130 name=cache2
cache_peer 192.168.5.165 sibling 80 3130 name=cache3
cache_peer_domain cache0 www.squid.com
acl Safe_ports port 80
acl Safe_ports port 3130
======
squid2
======
http_port 80 accel vhost vport
icp_port 3130
cache_peer 192.168.5.165 parent 80 0 no-query originserver no-digest name=cache0
cache_peer 192.168.5.161 sibling 80 3130 name=cache1
cache_peer 192.168.5.163 sibling 80 3130 name=cache2
cache_peer 192.168.5.165 sibling 80 3130 name=cache3
cache_peer_domain cache0 www.squid.com
acl Safe_ports port 80
acl Safe_ports port 3130
======
squid
======
http_port 80 accel vhost vport
icp_port 3130
cache_peer 192.168.5.163 parent 80 0 no-query originserver no-digest name=cache0
cache_peer 192.168.5.161 sibling 80 3130 name=cache1
cache_peer 192.168.5.163 sibling 80 3130 name=cache2
cache_peer 192.168.5.165 sibling 80 3130 name=cache3
cache_peer_domain cache0 www.squid.com
acl Safe_ports port 80
acl Safe_ports port 3130
---------------------------------------------
本文在介绍 squid 反向代理的工作原理的基础上,指出反向代理技术在提高网站访问速度,增强网站可用性、安全性方面有很好的用途。作者在具体的实验环境下,利用 DNS 轮询和 Squid 反向代理技术,实现了网站的负载均衡,从而提高了网站的可用性和可靠性。本文在介绍 squid 反向代理的工作原理的基础上,指出反向代理技术在提高网站访问速度,增强网站可用性、安全性方面有很好的用途。作者在具体的实验环境下,利用 DNS 轮询和 Squid 反向代理技术,实现了网站的负载均衡,从而提高了网站的可用性和可靠性。
现在有许多大型的门户网站如 SINA 都采用 squid 反向代理技术来加速网站的访问速度,可将不同的 URL 请求分发到后台不同的 WEB 服务器上,同时互联网用户只能看到反向代理服务器的地址,加强了网站的访问安全。
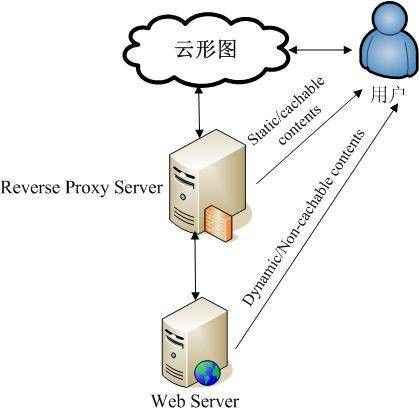
反向代理的概念
反向代理服务器又称为 WEB 加速服务器,它位于 WEB 服务器的前端,充当 WEB 服
务器的内容缓存器。其系统结构如图 1
图 1. 系统结构

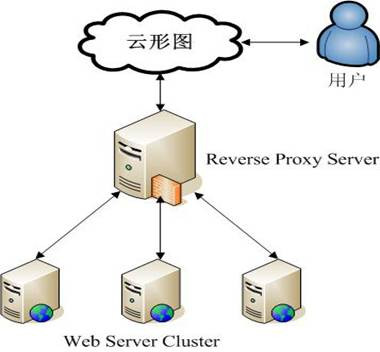
反向代理服务器是针对 WEB 服务器设置的,后台 WEB 服务器对互联网用户是透明的,用户只能看到反向代理服务器的地址,不清楚后台 WEB 服务器是如何组织架构的。当互联网用户请求 WEB 服务时,DNS 将请求的域名解析为反向代理服务器的 IP 地址,这样 URL 请求将被发送到反向代理服务器,由反向代理服务器负责处理用户的请求与应答、与后台 WEB 服务器交互。利用反向代理服务器减轻了后台 WEB 服务器的负载,提高了访问速度,同时避免了因用户直接与 WEB 服务器通信带来的安全隐患。
Squid 反向代理的实现原理
目前有许多反向代理软件,比较有名的有 Nginx 和 Squid 。 Nginx 是由 Igor Sysoev 为俄罗斯访问量第二的 Rambler.ru 站点开发的,是一个高性能的 HTTP 和反向代理服务器,也是一个 IMAP/POP3/SMTP 代理服务器。
Squid 是由美国政府大力资助的一项研究计划,其目的为解决网络带宽不足的问题,支持HTTP,HTTPS,FTP 等多种协议,是现在 Unix 系统上使用、最多功能也最完整的一套软体。下面将重点介绍 Squid 反向代理的实现原理和在提高网站性能方面的应用。
Squid反向代理服务器位于本地 WEB 服务器和 Internet 之间 , 组织架构如图 2:
图 2. 组织架构

客户端请求访问 WEB 服务时,DNS 将访问的域名解析为 Squid 反向代理服务器的 IP 地址,这样客户端的 URL 请求将被发送到反向代理服务器。如果 Squid 反向代理服务器中缓存了该请求的资源,则将该请求的资源直接返回给客户端,否则反向代理服务器将向后台的 WEB 服务器请求资源,然后将请求的应答返回给客户端,同时也将该应答缓存在本地,供下一个请求者使用。
Squid 反向代理一般只缓存可缓冲的数据(比如 html 网页和图片等),而一些 CGI 脚本程序或者 ASP、JSP 之类的动态程序默认不缓存。它根据从 WEB 服务器返回的 HTTP 头标记来缓冲静态页面。有四个最重要 HTTP 头标记:
- Last-Modified: 告诉反向代理页面什么时间被修改
- Expires: 告诉反向代理页面什么时间应该从缓冲区中删除
- Cache-Control: 告诉反向代理页面是否应该被缓冲
- Pragma: 用来包含实现特定的指令,最常用的是 Pragma:no-cache
利用 Squid 反向代理加速网站实例
本实例的域名是 wenjin.cache.ibm.com.cn,通过DNS的轮询技术,将客户端的请求分发给其中一台 Squid 反向代理服务器处理,如果这台 Squid 缓存了用户的请求资源,则将请求的资源直接返回给用户,否则这台 Squid 将没有缓存的请求根据配置的规则发送给邻居 Squid 和后台的 WEB 服务器处理,这样既减轻后台 WEB 服务器的负载,又提高整个网站的性能和安全性。该系统结构图 3 如下:
图 3. 系统结构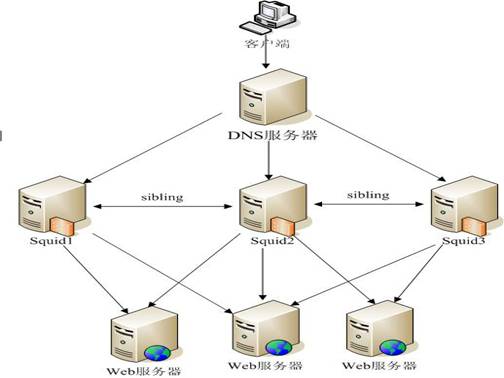
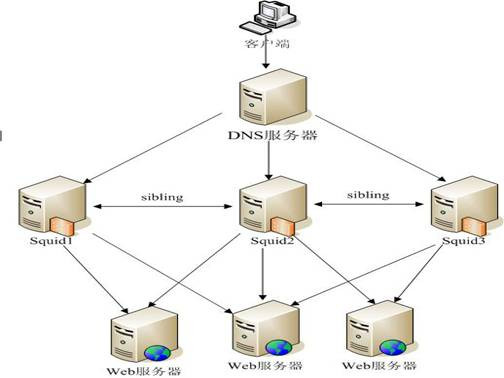
配置的系统环境:
一台 DNS 服务器:操作系统 Freebsd,软件 BIND 9.5,IP 192.168.76.222 ;
三台 Squid 服务器:操作系统 Linux AS 4,软件 Squid 3.0,相应的 IP 如下:
Squid1:192.168.76.223
Squid2:192.168.76.224
Squid3:192.168.76.225
三台 WEB 服务器:操作系统 Linux AS 4,应用软件 Tomcat 5.0+Mysql,相应的 IP 地址如下:
webServer1:210.82.118.195
webServer2:192.168.76.226
webServer1:192.168.76.227
应用软件的安装和配置
配置 DNS 服务器
软件利用 Freebsd 自带的 bind 9.5 。然后针对该系统配置 bind,首先修改 bind 的配置文件 /etc/namedb/named.conf,在文件中添加
zone "cache.ibm.com.cn"{
type master;
file "master/ cache.ibm.com.cn ";
};
再在 /etc/namedb/master 目录下添加 cache.ibm.com.cn 文件,该文件的内容如下:
$TTL 3600
@ IN SOA search. ibm.com.cn. root. ibm.com.cn. (
20080807 ; Serial
3600 ; Refresh
900 ; Retry
3600000 ; Expire
3600 ) ; Minimum
IN NS search.ibm.com.cn.
1 IN PTR localhost.ibm.com.cn.
wenjin IN A 192.168.76.223
wenjin IN A 192.168.76.224
wenjin IN A 192.168.76.225
这样当用户请求的时候,DNS 通过轮询机制将 wenjin.cache.ibm.com.cn 的域名解析为 192.168.76.223、192.168.76.224 和 192.168.76.225 其中之一。
配置完成后,运行 rndc star t 启动 bind 服务。可在 /etc/rc.conf 中设置 named_enable="YES" 使得开机自启动。
用 ps – A |grep named 查看 bind 服务是否起来;
用 nslookup wenjin.cache.ibm.com.cn 测试 bind 服务是否正常运行。
配置 Squid1 服务器
下载 squid-3.0.STABLE8.tar.gz 源码包,将其放在 /home 目录下
解压缩tar – zxvf squid-3.0.STABLE8.tar.gz
设置配置参数:cd squid-3.0.STABLE10
./configure – prefix=/usr/local/squid
将 squid 安装在 /usr/local 目录下
编译安装:make&make install安装完以后会在 /usr/local 目录下看见 squid 目录。
配置 squid 配置文件
编辑 squid.conf 文件,vi /usr/local/squid/etc/squid.conf
cache_effective_user squid
cache_effective_group squid
######### 设定 squid 的主机名 , 如无此项 squid 将无法启动
visible_hostname squid1.nlc.gov.cn
############# 配置 squid 为加速模式 #################
http_port 80 accel vhost vport
icp_port 3130
##### 配置 squid2、squid3 为其邻居,当 squid1 在其缓存中没有找到请求的资源时,
通过 ICP 查询去其邻居中取得缓存
cache_peer squid2.ibm.com.cn sibling 80 3130
cache_peer squid3.ibm.com.cn sibling 80 3130
##### squid1 的三个父节点,
round-robin 参数指明 squid 通过轮询方式将请求分发到其中一台父节点;
squid 同时会对这些父节点的健康状态进行检查,如果父节点 down 了,
那么 squid 会从剩余的 origin 服务器中抓取数据
cache_peer 210.82.118.195 parent 8080 0 no-query originserver round-robin name=webServer1
cache_peer 192.168.76.226 parent 8080 0 no-query originserver round-robin name=webServer2
cache_peer 192.168.76.227 parent 8080 0 no-query originserver round-robin name=webServer3
#### 将 wenjin.cache.ibm.com.cn 域的请求通过 RR 轮询方式转发到三个父节点中的一个
cache_peer_domain webServer1 webServer2 webServer3 wenjin.cache.ibm.com.cn
##### 下面是一些访问控制、日志和缓存目录的设置
acl localnet src 192.168.76.223 192.168.76.224 192.168.76.225
acl all src 0.0.0.0/0.0.0.0
http_access allow all
icp_access allow localnet
cache_log /usr/local/squid/var/logs/cache.log
access_log /usr/local/squid/var/logs/access.log squid
cache_dir ufs /usr/local/squid/var/cache/ 1000 16 256
####### 对 squid 的一些优化 ###############
maximum_object_size 10240 KB ### 能缓存的最大对象为 10M
maximum_object_size_in_memory 512 KB ### 内存中缓存的最大对象 512K
cache_mem 256 MB ###squid 用于缓存的内存量
保存后 :wq 退出。
在 /etc/hosts 文件中添加
192.168.76.223 squid1.ibm.com.cn
192.168.76.224 squid2.ibm.com.cn
192.168.76.225 squid3.ibm.com.cn
保存后 : wq 退出。
检查 squid 配置文件正确与否:/usr/local/squid/bin/squid – k parse
生成缓存目录/usr/local/squid/bin/squid – z
启动squid:/usr/local/squid/bin/squid
配置 squid2 和 squid3 服务器
squid2 和 squid3 服务器的配置方法和配置参数和 squid1 一样,配置完成后,分别启动这两个服务器上的 squid 服务。
在 squid 的日志文件 cache.log 中,出现如下日志信息则说明三台 squid 之间成功配置为 sibling,且配置了三个父代理。
2008/11/17 10:08:47| Configuring Sibling squid1.ibm.com.cn/80/3130
2008/11/17 10:08:47| Configuring Sibling squid3.ibm.com.cn/80/3130
2008/11/17 10:08:47| Configuring Parent 210.82.118.195/8080/0
2008/11/17 10:08:47| Configuring Parent 192.168.76.226/8080/0
2008/11/17 10:08:47| Configuring Parent 192.168.76.227/8080/0
2008/11/17 10:08:47| Ready to serve requests.
测试
测试之前,保证 DNS 服务、三台 squid 服务和三台 web 服务都正常起来。在客户端输入http://wenjin.cache.ibm.com.cn,则正确的显示该网页。服务器端的响应对客户端是透明的,客户端不知道请求是由哪台 WEB 服务器处理的;而且其中某台 Squid 服务器或 WEB 服务器发生故障,也不影响服务的正常运行。
总结
Squid 是一个开源的软件,利用它的反向代理技术可以提高网站系统的访问速度。本文在真实的网络环境下,利用三台 squid 反向代理服务器加速了网站的性能,同时结合 DNS 轮询技术实现了网站的负载均衡。经过一段时间的测试和试运行,该网站的访问速度和可用性方面都有很大的提高,从未出现过网站服务中断情况。